Blogger Hacks- How To Put Widgets Label Cloud Or Widgets Tag Cloud On Blogger Sidebar
A tag cloud or label cloud for blogger is a list of all the labels used within a blogger blog displayed with style.You can see a demo of the Label cloud widget here on my site. This Tag Cloud Widget was originally developed by phydeaux3. I have just simplified and made it easier to install..
You can see a good implementation of this label cloud widget on one of our readers blog -Speak Media Blog.
First Of all Goto Your blogger Layout>Page Elements page and add a Labels Widget there..You can Do that using the Add a Page Element Option on that page.
Blogger Hacks- How To Put Widgets Label Cloud Or Widgets Tag Cloud On Blogger Sidebar
Choose to sort the labels Alphabetically when prompted.
After Adding the Label Widget Goto Layout>Edit Html (Do not expand the widget templates for the sake of easy explanation)
You will find some code similar to
<b:widget id='Label1' locked='false' title='Labels' type='Label'/>
Add Code New
<b:widget id='Label1' locked='false' title='Label Cloud' type='Label'>
<b:includable id='main'>
<b:if cond='data:title'>
<h2><data:title/></h2>
</b:if>
<div class='widget-content'>
<div id='labelCloud'/>
<p align='center'>
<script type='text/javascript'>
var cloudMin = 1;
var maxFontSize = 25;
var maxColor = [0,255,0];
var minFontSize = 10;
var minColor = [0,0,0];
var lcShowCount = false;
// Don't change anything past this point -----------------
// Cloud function s() ripped from del.icio.us
function s(a,b,i,x){
if(a>b){
var m=(a-b)/Math.log(x),v=a-Math.floor(Math.log(i)*m)
}
else{
var m=(b-a)/Math.log(x),v=Math.floor(Math.log(i)*m+a)
}
return v
}
var c=[];
var labelCount = new Array();
var ts = new Object;
<b:loop values='data:labels' var='label'>
var theName = "<data:label.name/>";
ts[theName] = <data:label.count/>;
</b:loop>
for (t in ts){
if (!labelCount[ts[t]]){
labelCount[ts[t]] = new Array(ts[t])
}
}
var ta=cloudMin-1;
tz = labelCount.length - cloudMin;
lc2 = document.getElementById('labelCloud');
ul = document.createElement('ul');
ul.className = 'label-cloud';
for(var t in ts){
if(ts[t] < cloudMin){
continue;
}
for (var i=0;3 > i;i++) {
c[i]=s(minColor[i],maxColor[i],ts[t]-ta,tz)
}
var fs = s(minFontSize,maxFontSize,ts[t]-ta,tz);
li = document.createElement('li');
li.style.fontSize = fs+'px';
a = document.createElement('a');
a.title = ts[t]+' Posts in '+t;
a.style.color = 'rgb('+c[0]+','+c[1]+','+c[2]+')';
a.href = '/search/label/'+encodeURIComponent(t);
if (lcShowCount){
span = document.createElement('span');
span.innerHTML = '('+ts[t]+') ';
span.className = 'label-count';
a.appendChild(document.createTextNode(t));
li.appendChild(a);
li.appendChild(span);
}
else {
a.appendChild(document.createTextNode(t));
li.appendChild(a);
}
ul.appendChild(li);
abnk = document.createTextNode(' ');
ul.appendChild(abnk);
}
lc2.appendChild(ul);
</script>
</p>
<noscript>
<ul>
<b:loop values='data:labels' var='label'>
<li>
<b:if cond='data:blog.url == data:label.url'>
<data:label.name/>
<b:else/>
<a expr:href='data:label.url'><data:label.name/></a>
</b:if>
(<data:label.count/>)
</li>
</b:loop>
</ul>
</noscript>
<b:include name='quickedit'/>
</div>
</b:includable>
</b:widget>
Now find
]]></b:skin>
Add CSS Label Cloud Widgets for Blogger
#labelCloud {text-align:center;font-family:arial,sans-serif;}
#labelCloud .label-cloud li{display:inline;background-image:none !important;padding:0 5px;margin:0;vertical-align:baseline !important;border:0 !important;}
#labelCloud ul{list-style-type:none;margin:0 auto;padding:0;}
#labelCloud a img{border:0;display:inline;margin:0 0 0 3px;padding:0}
#labelCloud a{text-decoration:none}
#labelCloud a:hover{text-decoration:underline}
#labelCloud li a{}
#labelCloud .label-cloud {}
#labelCloud .label-count {padding-left:0.2em;font-size:9px;color:#000}
#labelCloud .label-cloud li:before{content:"" !important}
]]></b:skin>
Save your template and now you should get a working Label Cloud On your Blog.
How to Add Label Cloud Widget For Blogger
10 February 2008
Add Label Cloud Widget For Blogger
09 February 2008
Add "Review My Blog" Widgets My Blogger
How to Add "Review My Blog" Widgets My Blogger

User reviews are one of the most valuable interactive features your site can deploy. By building trust and confidence, reviews improve conversion rates, time on site and overall site experience. Users can add their own reviews, rate reviews submitted by others and engage in threaded conversations. Please take note that when you make a review, you are reviewing that specific url.
Below you can click to see the demo and please give this widget or my site a review.
How to Add "Review My Blog" Widgets My Blogger
The HTML code:
<div class="js-kit-rating"></div>
<div class="js-kit-comments"></div>
<script src="http://js-kit.com/reviews.js"></script>
For google powered blogs:
+/- See the Demo
How to Add "Review My Blog" Widgets My Blogger
07 February 2008
Add Posts Ratings Widgets for Bloggers
How To Add Posts Ratings Widgets for Bloggers

Give your readers the option to rate your blog posts.
Are you curious to know what your readers think about your site's content? By adding the outbrain rating widget you will get immediate feedback from your readers, and they will get easy and quick access to your best content. This widget works for Blogger, Wordpress, Drupal, a website/javascript, and Feedburner.
How To Add Posts Ratings Widgets for Bloggers
Steps:
- Click on "Template"
- Click on "Add page element"
- Click "HTML/Javascript"
- Copy and paste the code below
- Click "Save"
<script language="JavaScript">
var OB_platformType = 1; var
OB_demoMode = false;
var OB_langJS ='http://widgets.outbrain.com/lang_en.js';
</script>
<script src="http://widgets.outbrain.com/OutbrainRater.js" type="text/javascript"></script>
OR
You can get this rating widget here.Thanks to outbrain for providing this great widget.
How To Add Posts Ratings Widgets for Bloggers
Read More...06 February 2008
05 February 2008
Widgets Add Google Talk To Your Blogger
Widgets Add Google Talk To Your Blogger
Google Talk, long a fixture in Gmail, can now be added to your blog as a gadget.
The Google Talk Gadget lets you send instant messages, transfer files, make voice calls (to other Google Talk users) and leave voicemail messages. If you paste a Picasa Web Album or YouTube URL into a chat session, the gadget gives you an instant preview of the photos and videos.
Widgets Add Google Talk To Your Blogger
Read More...04 February 2008
Sudoku Widgets Generates Random Puzzles Game
Sudoku Widgets Generates Random Puzzles Game
The Sudoku widget generates random puzzles with five different levels of difficulty and shows when you have entered an incorrect answer.
Sudoku Widgets Generates Random Puzzles Game
Read More...03 February 2008
Widgets Add a Search form in Blogger
Widgets Add a search form in Blogger
Add Widgets Blogger Search Engine in the Sidebar of your blog.
Widgets Add a search form in Blogger
Read More...02 February 2008
How to Pictobrowser embed a Flickr Slideshow My Blogger
How to Pictobrowser embed a Flickr Slideshow My Blogger

How to Pictobrowser embed a Flickr Slideshow My Blogger
Read More...01 February 2008


13 January 2008
Customizing Your Blogger Template Video Clip
Customizing Your Blogger Template Video Clip
Customizing Your Blogger Template Video Clip
12 January 2008
Creating a Blog List with Blogger Video Clip
Creating a Blog List with Blogger Video Clip
Ever wanted to add a blog list or blogroll to your blogger blog? Check out this video tutorial!
Today we’re releasing a new page element for Layouts blogs: Blog List. The Blog List improves on our Link List page element by using blogs’ RSS and Atom feeds to show update times, post titles, and snippets.
Use a Blog List to put a blogroll in your sidebar, or make a few to categorize the blogs you read. The Blog List works well for any page that has an RSS or Atom feed, so you can get creative: link to news sites, podcasts, Twitter streams, search results, or anything else with a feed.
Here’s a quick summary of the features that a Blog List gives you:
- Link to blogs, web pages, and feeds from your blog’s sidebar, with an optional favicon
- For pages with RSS and Atom feeds, Blog List can show last updated time, post title, and a snippet of the latest post
- Sort links alphabetically or by last update time
- Show all links, or hide some behind a “show all” link
- Import subscriptions from Google Reader
- Blog List links are visible to search engine crawlers, so your blog’s PageRank and reputation flow to those you link to
Want to see it in action? We made a help video to walk you through adding and configuring a Blog List:
11 January 2008
Speed Up Your Blogger Page Load Time - Compress Your CSS
Speed Up Your Blogger Page Load Time - Compress Your CSS
You have to admit, most free 3rd party Blogger templates that you download are a mess. You open up the xml file and it’s a long and ugly-looking beast of code spaghetti. If you’re like me, you prefer a nice and neat template (even though you’ll be the only one seeing it) and you’ll want to tidy it up.
Most of the code you don’t want to tinker with but the .css code (the part that styles your entire blog with images and colors) is where some people like to change font colors, sizes, or even just space it out properly so it’s important that it’s not only neatly organized, but also properly aligned.
More importantly, did you know the more lines of code your template has, the longer it takes to load in a browser? So your 1,500 lines of code in your newest Blogger template could really be much shorter in size, thus speeding up page load times for your visitors. The slower your site, the more likely a visitor will be deterred and not wait for it to load up.
So here’s a neat trick to optimize your template. I’ve started doing it with some of the newer templates now being hosted on eBlog Templates. You’ll want to do what’s called “commpress your css” into a much smaller format. There’s a site I use called CSSDrive that offers a free web-based CSS Compressor. All you do is select a few basic options like compression mode and comments handling and then paste in your css. The css is the code between the <b:skin> and </b:skin> tags.
Make sure you backup your template code before doing this! Some people might not like how the css looks after it’s compressed so it’s best to have a backup. You also might make a mistake and copy the wrong sections which could screw up your template code. Bottom-line, backup your template before doing this.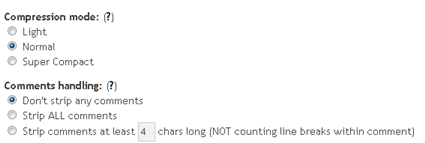
After you click on the “Compress-it!” button it will go through your .css code and shrinks it down. Essentially it removes unnecessary white spaces and better organizes each css element into one line. Here are the results for one of the Blogger templates I compressed.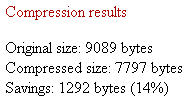
My xml Blogger template was originally 1,286 lines of code and after the css compression was done, it dropped it down to 914. Now that’s not a huge difference (14%) and you probably won’t notice a difference when you load up your blog with the new code, but every little bit helps. Also, some template code might be messier than others so the size decrease could potentially be a lot more.
I also just ran the normal compression mode and wanted to keep my comments so if you go with the super compact mode and strip out all comments, you can compress it even further.
This tool can be used for WordPress blogs or any other websites actually. Most of the Blogger templates I come across are the ones in need of a code clean up, however. So if you’re ready to give CSS Compression a shot, check out CSS Drive’s free tool and compress away!
Source : eblogtemplates.com
10 January 2008
Uploading a Video with Blogger Video Clip
Uploading a Video with Blogger Video Clip
Ever wanted to upload a video to your Blogger blog? Check out this video tutorial!
Today we are releasing video uploading to Blogger! This feature allows you to upload videos and create a video podcast with the same ease that we currently provide with photo uploading.
When you go to the Blogger post editor, you'll see a new button ( ) next to the image uploading one. Just select a video from your computer, wait a few minutes for the upload and processing to occur, and voila! Now when you visit your blog, you will see something like this (of course without Tomo, the Blogger Akita):
How long does it take to upload and process a video?
Uploading a video may take a while, since videos tend to be very large files. However, the exact amount of time required will depend on the size of your specific video and the speed of your internet connection. The processing stage usually takes about five minutes. Blogger will display a status message below the post editor to let you know how this is going, and there will be a placeholder icon in your post to show where the video will appear.
09 January 2008
Creating a Podcast with Blogger Video Clip
Creating a Podcast with Blogger Video Clip
Ever wanted to know to create your own Podcast with Blogger? Check out this video tutorial!
In this article we show you exactly how to produce a podcast. Why is this important? Because, as stated above, "Anyone can have an audience," and podcasting allows you to reach millions of potential clients- for free. No other medium available today can do this. You can publish books, get booked on radio shows, give seminars, advertise, and network like crazy, and not reach a fraction of the audience possible with podcasting.
08 January 2008
Adding a Google Gadget to your blog Video Clip
Adding a Google Gadget to your blogger
Add thousands of Google Gadgets to your Blogger blog by following this video tutorial!
Spice Up Your Blog with Google Gadgets!
Fresh out of Blogger's own Testing ground, Google Gadgets have now been enabled for all layouts blogs. This new interface allows for the integration of iGoogle Gadgets directly into your sidebar, with an array of customization options for easy tweaking. Also built into Gadgets is our robust Gadget Directory, which lets you browse through thousands of cool gadgets and add them to your blog with a simple click of a button.
You can access Gadgets from your dashboard under the Layout | Gadgets tab (the tab formerly known as "Layout | Page Elements.")
Gadgets have built-in configuration for easy integration into your layout. All gadgets are automatically sized to match the width of your sidebar, and their height in pixels can be adjusted using the Gadget's built-in options. Our large list of Gadgets is constantly growing and evolving. You can browse them all from our comprehensive Gadget Directory, which runs the gamut from sports updates to site counters, and flash games to local information tickers. To bring up the Gadget Directory, just click Add a Gadget from your layout. Have an idea for a gadget that isn't listed? Then build it yourself! We are always on the lookout for great ideas, so please submit your own creation to the iGoogle Gadget Directory, and then let us know about it in our Help Group— we may just add it to our 'Featured Gadgets' Section.
Itching to get started? Have a look at our our help video below for some guidance on browsing, adding, and customizing a gadget on your blog:
07 January 2008
Purchasing and setting up a Custom Domain through Blogger
Purchasing and setting up a Custom Domain through Blogger
Have you ever wanted to set up your own Custom Domain through Blogger? Check out this video tutorial!
How do I buy a custom domain through Blogger?
Interested in purchasing and setting up a custom domain through Blogger? Either read the instructions below or click on the video to watch a tutorial!
You can buy a domain from the Settings | Publishing tab,. Just select the Custom Domain option, enter the domain name you'd like and click Check Availability. This will take you to the Google Apps domain purchase website, which will let you know if the domain is available and proceed with the registration if it is. Finally, you'll go to Google Checkout where you'll make your payment. Your domain is registered with one of our registration partners, either eNom or GoDaddy.
You'll get a domain registration confirmation email from Google Apps. Clicking the link in this email allows you to sign this domain up for an Apps account. Google Checkout will also send you an email with the order receipt.
06 January 2008
How to create a blog with Blogger Video Clip
How to create a blog with Blogger Sign in to use Blogger with your Google Account
The new Blogger requires a Google Account to access your blogs. Haven't switched yet? Sign in using your old Blogger account instead.
Blogger is a free blog publishing tool from Google for easily sharing your thoughts with the world. Blogger makes it simple to post text, photos and video onto your personal or team blog. Sign in to use Blogger
with your Google Account
05 January 2008
Blogger bX Errors - How to Fix Them Blogger Templates
Blogger bX Errors - How to Fix Them Blogger Templates
Any of you who have tried to change Blogger templates or moved around your blog’s page elements have probably seen the dreaded Blogger “bX-xxxxxx” cryptic error message.
“We’re sorry, but we were unable to complete your request. When reporting this error to Blogger Support or on the Blogger Help Group, please:
- Describe what you were doing when you got this error.
- Provide the following error code and additional information.
Great…this really helps us fix the problem right now. It’s frustrating enough to see an error message after trying to make what seems like a trivial change to your blog and how can you fix the problem if you’re given an error code instead of a actionable error message like “template is incorrect on line xx”? Blogger’s support area doesn’t even give you information on what each error means and how to resolve it so if you want their help you need to post a message and wait 12+ hours for someone at Google support to respond. You would think Google would spend some more time and resources to improve their error messages and Blogger support.
So the main question is what does the error message actually mean and how can you fix it now?
For me, I was able to fix it by making a few changes but there was no exact science as to how I did it. I first attempted to search Google for a solution as well as Blogger’s help center and support group. No such luck. What I did discover though was the numerous others who had similar bX error messages as me with no resolution. Apparently the best way to get assistance is to first read Blogger’s How to Report a Problem and then post in the Blogger support group. I wasn’t interested quite yet and wanted to fix the problem myself (or at least try) before posting in Blogger’s support group.
What I discovered when trying to repair my blog was the following:
- The bX-xxxxx error codes don’t mean anything specific. The characters after the bX- change each time so there’s no logic behind the numbers. Next time you get an error, try refreshing the page a few times. You’ll notice the error codes actually change even though your error should still be the same.
- When I tried to modify my page elements (clicking on the wrench/screwdriver icon) within my browser using Firefox I later had trouble. Seems to be a bug within Blogger.
- Clicking on the “Revert widget templates to default” link within the “Template” => “Edit HTML” page didn’t fix nor hurt anything (besides losing my widgets). In other words, don’t do it.
- Adding a new Blogger template and clicking “Save Template” instead of “Preview” showed me a couple of page elements like Text1 and Footer1 that were going to be deleted. The problem was, I didn’t have either of those in my current Blogger layout. They were removed via Firefox previously (don’t edit Blogger layout using Firefox).
- Switching over to Internet Explorer I was able to successfully apply the new template. I then could go back to Firefox (my browser of choice) and modify or apply any other new template.
So in my experience Firefox as well as some ghost page elements that I previously removed seemed to cause the issue. If you are troubleshooting your own bX errors and using Firefox, I would switch over to Internet Explorer and apply a new template. If you only use IE and still get a bX error, I would first try another Blogger default template (there might just be a problem with your new template) to isolate the issue.
If that fixes it then you know it’s the new template having trouble interacting with your page elements. If it’s still not fixed with the Blogger default template then it’s probably because of your page elements. If you don’t mind removing any custom page elements you may have (you’ll lose the data within the page element if you do) then one by one, remove the page elements. Apply the new Blogger template after each time and see if that fixes it.
Conclusion
Unfortunately there isn’t a clear cut solution for addressing the Blogger bX error codes. In most instances, each case is unique depending on the number of page elements you may have, the type of page elements, and the template you’re using. I feel really bad for the hundreds of Blogger users out there who come across this bX error and don’t know what to do. I do have confidence that Google will soon enough fix this issue one way or another because it’s eventually going to become a huge issue (it’s already a big deal).
If you’ve attempted to fix your blog using the techniques I’ve mentioned above and still didn’t have any luck, feel free to comment below. We will do our best in answering your questions but can’t promise any solution. I’d also post your error information in Blogger’s Help Group so in case you can’t figure it out yourself, someone from Google will fix it for you within the next day or so.
Blogger bX Errors - How to Fix Them Blogger Templates Read More...
04 January 2008
How to Setup Your Recent Posts and Recent Comments Blogger Page Elements
How to Setup Your Recent Posts and Recent Comments Blogger Page Elements
In order to enable the Recent Posts and Recent Comments page elements in your recently downloaded Blogger template, you need to follow a couple simple steps.
These lists aren’t going to show up when you first install the template so we’re going to bring them to life now. They are actually both RSS Feed widgets so we’ll need to paste in your feed and comment rss feeds to make them work.
Let’s start with the Recent Posts page element so click to edit it. Then paste in your RSS feed url which will most likely be in this format http://YOURSITE.blogspot.com/feeds/posts/default . Make sure to replace “YOURSITE” with your actual blog url.
There’s no need to change the title (unless you want to call it something else) so then hit “Save Changes”. Then save your blogger layout and go over to your other browser window, refresh and see the Recent Posts appear in your blog’s sidebar.
Now you’re going to do the exact same thing with the “Recent Comments” page element but you’ll instead use this feed format http://YOURSITE.blogspot.com/feeds/comments/default . Again, make sure to replace “YOURSITE” with your actual blog url. Save and make sure it’s working properly. If it doesn’t appear on your blog, chances are you don’t have the correct feed url or you might not have any comments yet.
If you really want to fine tune your Recent Posts and Comments settings like increasing the max number displayed to 10 you can. Go read our advanced recent posts settings article and take your widgets to another level.
Source:eblogtemplates.com
How to Setup Your Recent Posts and Recent Comments Blogger Page Elements
03 January 2008
How to Install a Blogger XML Templates
How to Install a Blogger XML Templates![]()
This article was written to provide a step-by-step guide on how to correctly apply a new xml Blogger template to your blog. This process can be tricky depending on several factors (quality of the code in the new template, your existing widgets, etc) so you need to be careful when changing your template. Don’t worry though, just follow our step-by-step instructions below and we’ll hopefully get you through it without much pain.
Many people make the same mistake when installing a new blogger template. Most problems when installing a new template are caused by the blogger widgets (Page Elements) that you’ve spent time setting up in your previous template. Almost all Blogger templates available for download on this site are in the new Blogger xml template format so if you’ve downloaded the template from us, it’s going to be much easier to follow our instructions.
Step #1 - Backup Your Current Template
Backup your current Template just in case you make a mistake. This is very important so you can always go back (click on the screenshot to the left to see exactly how this is done). You’ll want to navigate to the “Template” => “Edit HTML” section of Blogger and then look for the “Before editing your template, you may want to save a copy of it. Download Full Template“. Click on the “Download Full Template” and save it somewhere easy to find later on your computer. We are not responsible for any mistakes you make in applying your new Blogger template. Once you have saved this .xml file onto your computer, move on to step #2
Step #2 - Take a Screenshot of Your Page Elements
This next step isn’t necessary but I like to do it anyhow. Take a screenshot of your “Page Elements” page just so you know exactly what widgets (Page Elements) you had before applying the new template (an example of the exact page you should take a screenshot of is in the image to the left). If you blow away all your widgets and you don’t remember which ones you had, this screenshot will at least help you remember. If you’re unsure as to how to take a screenshot, then check out this quick tutorial (MS Windows).
Step #3 - Upload Your New Blogger Template
Now it’s time to upload the new Blogger template from your computer. You’ll want to navigate to the “Template” => “Edit HTML” section of Blogger and then look for the “Upload a template from a file on your hard drive:” text. To the right of that you’ll see two buttons. First, you’ll click on “Browse” and navigate to the new .xml Blogger template on your computer and click “Open”. Then you click on the “Upload” button and cross your fingers.
At this point Blogger is attempting to apply the new .xml Blogger template to your blog. After it’s done, you’ll get a message stating that the upload and new template was applied successfully (in that case you’re done!) or more likely in my case, you’ll get a red error message that states something like:
Widgets are about to be deleted
Please confirm that the following widgets should be deleted. All the widgets’ configuration data will be lost.
- Text1
- BloggerButton1
- Poll1
- Profile1
Now if you’re like me, you don’t want to lose all those widgets (Page Elements) you spent lots of time configuring and arranging on your blog. If you don’t care and really don’t have anything you’ll be upset losing, then go ahead and click on the “Confirm and Save” button that looks like this:
Just remember, that you’ll need to re-add any page elements that you had previously setup in your old template. If they were simple or just recently added then I’d recommend just re-adding them instead of having to follow the next steps. If you decide you want to keep your widgets (Page Elements) then write down (or take another screenshot) the list mentioned above that are going to be deleted. You’ll use this list later when we migrate over your widgets.
Step #4 - Transfer Widgets to New Blogger Template
This process is going to take some careful cut and pasting within the template code so if you’re not comfortable doing this, then I’d recommend just ending on the previous step. First things first, click on the blue cancel button (you should still be on the previous step) that looks like this:
This will cancel out of the new Blogger template you were just trying to upload. Next, we’re going to essentially make a temporary placeholder for your widgets (Page Elements) within your current template. You should still be in the “Template” => “Edit HTML” section of Blogger so if you’re not, go back to that section.
You’re going to actually edit this template code now so pay close attention. Look for the following piece of code which is all the way at the bottom.
</body></html>
Now you’re going to replace that code with the following bit of code:
<b:section id='widgets-placeholder' showaddelement='yes'/></body></html>
Save your template and you’ll see this message (which is a good sign):
What did we just do? We created a brand new widget (Page Element) in your current Blogger template so we can move all your widgets over to keep them safe! Next navigate over to the “Template” => “Page Elements” section of Blogger and you’ll see a blank new footer section.
Drag all your widgets (Page Elements) that were going to be deleted (we wrote them down or took a screenshot in step #3). The order doesn’t really matter as long as you’ve moved them all down into the widget (top image on left). After you’re done, it should look something like this (bottom image on left):
Now click on the “Save” button and the temporary placeholder for our widgets will be saved. We’re not done quite yet but if you’ve gotten this far already you’ve done great! The hardest part is over. Now we’re going to copy the widgets we just protected over to your new template. Hold off on that bathroom break and let’s keep going.
Next, go back to the “Template” => “Edit HTML” section of Blogger and scroll down in the template code and look for the line of code you added before:
<b:section id='widgets-placeholder' showaddelement='yes'/></body></html>
There should now be a bunch more code in between it which will look something like this:
<b:section id='backupwidget' showaddelement='yes'>
  <b:widget id='BloggerButton1' locked='false' title='' type='BloggerButton'/>
<b:widget id='Poll1' locked='false' title='What is your favorite car' type='Poll'/>
<b:widget id='BlogArchive1' locked='false' title='Blog Archive' type='BlogArchive'/>
<b:widget id='Profile1' locked='false' title='About Me' type='Profile'/>
</b:section></body></html>
This is a list of all your widgets (Page Elements) that we just moved into the footer. You want to select all this code and copy it. We’re going to paste it into our new Blogger template code which will complete the transfer safely.
Now open your new Blogger template xml file in a text editor (you can use Notepad, just right click -> Open With -> Choose Notepad). Once you have it open, scroll all the way down to the bottom of the code and look for the following code:
</body></html>
You’re going to replace this code with the new code you just copied above. Make sure you only replace that one bit of code otherwise you might run into some problems. Save your new Blogger template and you’ve finished transferring your widgets (Page Elements) into the new Blogger template!
Now after all that work just to save your precious widgets, let’s hope the new template works ok in Blogger. Go back to step #3 above and upload your new template like you attempted to do before. If all goes well, your new template will properly save and your blog will be updated!
Step #5 - Move Your Widgets Back To Their Original Spots
I’m assuming your new template installed without and problems and you’re ready to move your widgets (Page Elements) back to their original spots. This is just the reverse process of what we did before by going to the “Template” => “Page Elements” section of Blogger and moving them out of the footer and back into the sidebar (or wherever you originally had them in your old template).
After you arrange them to your liking, make sure to save and view your blog. If all went well then your blog should be looking the way it did before the new template was applied (well, except for the new beautiful design which is the main reason for this hassle in the first place right?).
Summary
Congratulations on adding a new custom Blogger xml template to your blog! The whole process should have taken anywhere from 15 minutes to 1 hour depending on your experience and comfort with blog template code, the code quality of the new template, and the number of widgets your blog currently has. Blog designs shouldn’t have to change very often so hopefully this is a one-time process for you. If not, I recommend you bookmark or add this page to your favorites so it’s easy to find the next time you decide to change Blogger templates.
Still Having Problems?
Problems or errors during this procedure? Unfortunately, the Blogger xml templates are very picky and don’t always work with your blog. This can be because of several reasons so it’s not always easy to resolve. Sometimes the best way is to just delete one widget at a time and see if that resolves the issue. Blogger doesn’t give you very good error messages to act on so sometimes it’s a shot in the dark.
If you’ve got a specific case you’d like to ask about, please post a comment below. I will respond and help if possible. Your specific problem might help others address their issue as well.
Source:eblogtemplates.com
How to Install a Blogger XML Templates


feedback widget,